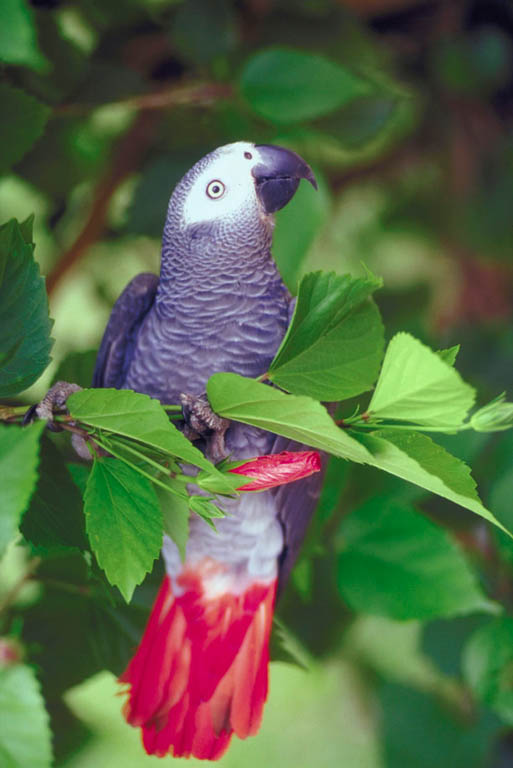
Many times babies are hand-reared simply for hand-feeding experience or to make a tame pet. Whatever the reason you decide to hand-feed you are sure to find it to be a rewarding experience.
PREPARATION—The Key To Success
Before attempting any type of hand-feeding, whether day-one feeding or pulling older chicks, be prepared. As with any job the proper equipment is essential.It is prudent to become familiar with hand feeding all equipment and emergency supplies.
Some 'basic' tools required to successfully hand-feed are:
1. A reliable brooder with a thermometer and safe, absorbent bedding
2. A good commercial hand-feeding formula & formula thermometer.
3. An assortment of feeding instruments, in various sizes
4. A good disinfectant and sanitation program.
5. An accurate gram scale and a record keeping system.
6. An assortment of emergency supplies, such as:
An electrolyte solution (Ornalyte, ‘Lactated Ringers' or Pedialyte); appropriately sized feeding needles; papaya tablets; silver nitrate sticks or liquid; Betadine; and an assortment of medications and remedies.
EVALUATE THE CHICKS CONDITION
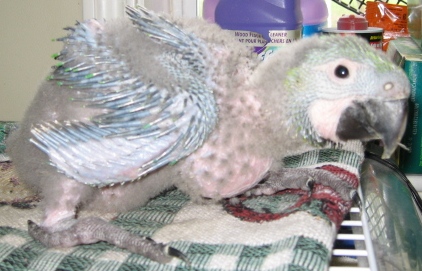
Before electing to hand-feed a chick of any age, an evaluation of its overall health and condition should be made. The chick’s skin should be a healthy pink or yellowish pink. It should be soft, glistening, and warm to the touch.
If under one week he should be wiggly when touched and exhibit a feeding response when the corners of his beak are stroked. Older chicks should be alert, plump and clear eyed. After pulling, chicks should be monitored and examined at several times a day to check for potential problems. Monitoring weight gain and loss is the best way to identify a problem before it becomes visibly obvious. Unhealthy & stressed chicks will require special care and technique.
All parrot chicks require supplemental heat and nourishment to survive. A stable environment of the correct temperature and humidity is important for growing chicks. Humidity should be provided for all young chicks and for older chicks in dry climates. A range of 55-70% humidity is recommended and will produce quieter, fatter babies with a greater growth rate than those kept at levels of 15-35% humidity (Clipsham, 1989b). Extreme temperature variations in brooder environment can cause serious health problems, even death. Inconsistent temperatures result in weak chicks, slow growth rates, and/or poor digestion.
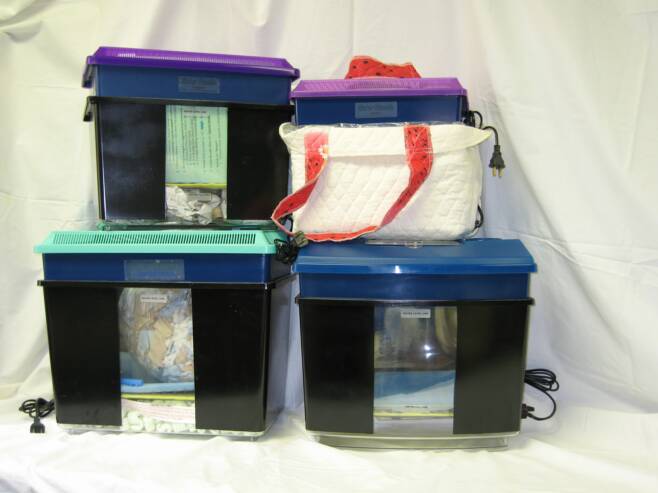
A GOOD BROODER A NECESSITY
It is best NOT to attempt to make your own brooder for psittacine babies unless you have expertise and several years experience brooding and hand-feeding babies. It is best to purchase a proven brooder from a reliable company. Of course, in emergency situations, a heating pad on low, placed partially under up the side of a ventilated, covered container can prove useful. It is important to provide a layer of insulation such as a folded towel under the chick as protection from harsh heat. This brooder setup should be used temporarily until a more reliable/safe brooder can be obtained. A wet sponge in a baby food jar placed inside the make-shift brooder will help with humidity
.
A good avian brooder should meet certain criteria: it should be safe, easy to clean and disinfect; not cumbersome and easy to handle, easy to control temperature, easy to get to babies and if possible, portable. Our Water Nannie Brooders were designed specifically for delicate day-one hatchlings. . When using our Water Nannie brooders we do not recommend using cups or containers to support and separate tiny chicks.We do, however, recommend our specially designed cloth ring to support very young babies under one week. The "Baby Support Ring" is strategically placed, at the warmest point in the brooder, over a clean white washcloth. The washcloth provides footing and makes it easier to monitor each baby's droppings, as to consistency and frequency. The “Baby Support Ring” helps to prevent accidental aspiration and leg problems such as splayed legs. A Baby Support Ring is unnecessary for strong, older, normally developing chicks as it is healthier and more natural for them to be able to move freely about the brooder.
Some breeders and brooder manufacturers may require or recommend using separate containers or cups for holding babies inside their brooders. When using containers, they should have straight sides, inside liners and bedding, which provides for firm footing. Do not use wood chips as they are likely to be ingested.
CHOOSE BEDDING WISELY
Never use wood chips, corncob, recycled paper by-products (which look like chewed up wads of paper) or foodstuffs as bedding. These beddings are potentially dangerous, can harbor excessive amounts of bacteria, and may cause health problems that require veterinary assistance. It is safe to use disposable baby diapers, paper towels, cloth towels or our own, thoroughly tested, "Baby Bedding".Change bedding all bedding frequently and keep brooders clean. Hygiene is very important when hand-feeding.
CARING FOR THE DAY-ONE HATCHLING
Day one neonates need special treatment. At hatch be sure to swab a small amount of Betadine antiseptic on the navel. Then let the chick dry off and rest. If the hatchling seems restless and has a feeding response after the rest period, administer a few drops of warmed electrolyte solution. This can give the chick an extra boost, especially appreciated after a strenuous hatch. It is unnecessary to feed the chick any type of formula immediately after hatching. He has just gone through a stressful time. The hatchling is still feeding off his yolk sack, which was just pulled into his stomach before hatching. For a few hours after hatching the yellow yolk sack is visible behind the belly button.


HAND FEEDING FROM DAY-1
By
Wanda Barras
The hand-rearing of baby psittacines from day-one through weaning can be a very rewarding experience, however it requires an enormous amount of dedication and hard work. Hand-feeding is time consuming, labor intensive and not an exact science. A commitment to hand rear should be taken very seriously. You are taking on the responsibility for the complete care and well being of a totally helpless and fragile creature.
Baby birds are individuals that don't always respond to favorite feeding methods or preferred formulas. Some of the anxieties and misgivings encountered when hand-feeding can be alleviated by following simple guidelines.
Being aware of what to expect gives you the ability to handle problems as they arise. A working knowledge of technique and experience can help to minimize and prevent problems. Successful hand rearing requires a good deal of research, planning and forethought. Read books and articles written by experienced aviculturists about their hand rearing experiences. There are several excellent books on hand-feeding. Rick Jordan and Howard Voren's Parrots: Hand-feeding and Nursery Management and Rosemary Low's Hand-rearing Parrots (out of print) come to mind. I also recommend a working relationship with a good avian veterinarian, one who has experience with avian pediatrics. Cultivate a friendship with a seasoned breeder/hand-feeder, one who is willing to share knowledge & expertise.
SAME CARE FOR MOST PSITTACINES
The technique for hand-rearing psittacine babies is basically the same for most species. Simply, the baby is kept warm, and measured amounts of warmed formula are administered at frequent intervals. It makes no difference, whether Lovebird or Macaw, the feeding technique and pediatric care is similar. Only size, quantity fed and expected weaning time varies.
Become familiar with the particular species you intend to hand-feed. Some species are more difficult to hand-feed than others and may require specialized care, diet, feeding technique or brooding temperature. Lories and Lorikeets come to mind because of their specialized diet. Eclectus, Pionus and Cockatiels are notorious for their tendency towards slow crop (crop stasis) and Candida (a yeast infection of the crop or digestive system). Remember there is exceptions to the rules and variables do apply.
There are many incentives for hand-raising baby psittacines. Abandonment, inexperience or abuses by parent birds are common reasons for hand-feeding. Babies are sometimes pulled early to increase production and to supply tame babies for the pet trade.
You are invited to utilize the resources and links to informational sites and forums.
Visit our Web Store for All Your Avian Hand-Feeding & Breeder Supplies. .
Belle Ècorce Farms'
Cage'N Bird---ARTICLES on Avian Hand Feeding & Husbandry
TINY BABY, TINY CROP, TINY FEEDING UTENSILS
Newly hatched chicks have very small crop capacity. They require extremely small amounts of a dilute hand-feeding formula, given frequently. For example, large Macaw babies can only take 0.3cc to 0.5cc for their first feeding; tiny Lovebird babies, only a drop, barely 0.1cc. Tiny pipettes. 0.5 or 1cc syringes are ideal for neonates. Using the proper size tool and caution makes it less likely to aspirate (accidentally inhale liquid into lungs) a new hatchling.
PROVEN DAY-ONE FORMULA
The regular feeding schedule can begin from 4 to 6 hours after hatching. Feeding can commence after the yolk sack is no longer visible under the skin. I have successfully started all our day-one babies on the formula below. The first formula feeding should consist of the following:
AVIAN STRAIN PROBIOTIC RECOMMENDED
This is also a good time to add an avian strain probiotic to the baby’s diet. There are many on the market, some in powdered form that can be added directly to formula. Bird Bene-Bac Gel is another. I prefer a gel, as a measured amount can easily be put into the baby’s beak. A probiotic replaces the bacteria normally manufactured in the gut of the parent bird. This “good bacteria”, or natural flora, aids in digestion. Normally the natural flora is supplied by the parent bird to the baby through regurgitation.
In past years, yogurt was often recommended as a substitute for the natural flora provided by the parent. However, studies have shown that this form of lactobacillus does not multiply in the avian gut. Because yogurt is a mammalian product it should be used on mammals not birds. An Avian strain probiotic will prove MOST beneficial. Healthy flora will be introduced and thrive.Thereby promoting a healthy digestive system.
Several hours after hatch (after the yolk sack has been absorbed), when chick is restless and seems hungry, prepare a small amount of our Recommended Day-One formula. It is best to use a tiny 0.1 or 1cc syringe for the first day or so of feeding. It is easy to control and simple to warm and disinfect. 1cc pipettes, tiny spoons or even a small artists paint brush may be used to dribble the warm formula into the baby. Use the feeding instrument you are most comfortable with.
SANITATION IMPORTANT
After feeding, wash all feeding tools in soap and water. All washed feeding instruments may be soaked in an avian disinfection solution Thoroughly rinse utensils before each feeding. Nolvasan, a chlorhexidine, is not recommended as a soak. As a low level disinfectant it is ineffective against a wide variety of pathogens.
NOTE: Pseudomonas are known to grow in Nolvasan! However, Nolvasan solution is safe for quick brooder wipe up with chick present.
For those of you who prefer natural or just do not have a sterilizing agent or disinfectant on hand may want to try distilled white vinegar. After feeding babies, Rinse all formula from utensils. Fill a sink half full of hot water; add 1 cup of white vinegar and a little dishwashing detergent. Thoroughly clean each utensil. Rinse well and allow to dry in an upright position. Once a week you may elect to soak utensils in straight vinegar for several hours or overnight. Rinse well before using.
Formula temperature should never be under 100° or over 110°¼for most species 103°F to 105°F ideal.
 DO NOT USE MICROWAVE TO HEAT FORMULA
THE FEEDING TECHNIQUE
The feeding technique is uncomplicated. Draw a small amount of formula into a clean 0.5 cc or 1cc syringe. A simple and safe way to warm the formula filled syringe is by placing it in a mug of hot (103-105 degrees F) tap water. Formula temperature is very important when hand-feeding any age chick, especially very young ones. Always use an accurate formula thermometer to measure formula temperature. The ideal formula temperature for most species is 103°F (same as most birds’ body temperature). Some species such as Macaws may prefer a little warmer formula (105° to 108°F). Formula temperature should never be under 100° or over 110° or complications such as crop stasis and/or crop burn may result.
To administer the warmed formula, gently place your thumb and index finger on either side of the babies head. Move your fingers so that they touch the corners of the babies mouth (the commissures). This usually stimulates a feeding response. As the baby’s head pumps, slowly dribble tiny amounts of formula into his beak. He won't take much! Fill the crop, but not so full that it is rising up his neck. The chick's crop should be nicely rounded. The rule is; firm but not tight. Feeding a thin formula for the first few days is recommended because it helps the chick to re-hydrate after hatching and also to get all organs functioning properly
FREQUENT FEEDINGS REQUIRED
For the first day you will be feeding about every hour. Very small species such as Parrotlets may require feedings every half hour…the smaller the species the higher their metabolism. Some experts recommend feeding around the clock. I believe you should try to feed around the clock for the first two to three days but missing one or two feedings in the middle of the night usually won't prove harmful. Like a human infant, he will cry when he is hungry or uncomfortable.
If the brooder is placed near your bedroom, it is possible to hear even the smallest hatchling crying for his nightly feedings. If he cries and is empty feed him, but if he cries constantly and is full, check the brooder temperature and adjust it accordingly. It is important to monitor baby and brooder temperature often, when feeding a chick this age it is crucial that he not get chilled. Some hand-feeders will feed the chick while he is in the brooder or over a covered heating pad at a counter or table. Feed the baby, then immediately put him back into the brooder.
.
MORE FOOD --- LONGER DIGESTION TIME
Each day, try to increase the amount fed to the chick. As the chick grows the crop capacity will grow. By the second day the baby is usually demanding food every two hours so it is time to begin changing over from the weak Day-One formula to a richer ‘prepared’ formula. This change over usually takes five to six days. Add a small amount of prepared (hydrated, premixed) commercial hand-feeding formula to the original Day One formula. Begin using 1/4 to 1/2 of a measure of your formula of choice. ( For Kaytee Exact formula approximately 2-1/2 to 3 parts Ringers or sterile water to 1 part Exact would be added to Day One formula) This added amount should be enough for the first change over. The commercial formula mixture is slowly added to the Day-One formula a little more each day until the new baby is entirely on the commercial formula. From day 5 to weaning, the recommended proportion is 1 part Kaytee Exact formula to 2 to 1-1/2 parts water). Use caution when changing over to the thicker more nutritious formula. Monitor the crop and watch that it empties in a reasonable amount of time.
There should be a gradual increase in crop emptying time between feedings. For example: If a three-day-old chick is taking over three hours to digest, and there is a noticeable difference from the previous crop digestion time. The formula must have been a little too thick. Carefully administer to the troubled chick a drop or two of warm Lactated Ringers every 15 to 30 minutes until digestion is back to normal. When the crop is empty, return to feeding a little thinner version of the previous formula administered. The formula should be thinned slightly (you do not want the formula too watery) with a little papaya juice or slurry of electrolyte solution and powdered or natural papaya (papaya is a natural enzyme that will help break down the food particles and aid digestion). Remember, it is best to NEVER feed formula to a chick whose crop has not emptied or is slow to empty. A solution of papaya and Lactated Ringers will usually correct the problem, help to prevent dehydration and provide needed nutrition. This remedy may be used to dissolve a slow crop at any age. Handy when pulling a parent fed chick with a full crop. Small amounts of the warmed solution, provided frequently, are the rule.
NOTE:My hand-feeding formula of choice is Kaytee Exact, and Zupreme. I find these formulas easy to use and are accepted by most species from hatch through weaning. Species-specific formulas are now available. I have had great success with Exact when feeding cockatiels, lovebirds and quakers.
HAND REARING FORMULAS
You should use our recommended day one formula as suggested above, then slowly convert to your commercial formula. I do prefer KayTee and been using it successfully, for years, on many species of parrot raised in our avian nursery. It is essential that you read and follow the instructions provided with commercial formulas. Understanding and properly following the directions can mean the difference between success and failure. Always discard unused formula. Never use a microwave to heat formula. Always use a thermometer to check temperature . It is best to use sterile water, hot filtered tap water or hot bottled water.
DAILY WEIGHING & RECORD KEEPING ADVISED
Although not absolutely necessary, weight data is helpful to monitor the chicks progress. A healthy chick should gain weight every single day until he approaches weaning. That is 15% each day for the first 10 to 14+ days, then at least 10% daily. To determine percentage weight gained, weigh the chick, with an empty crop, and record his weight. On the next day at approximately the same time and on an empty crop weigh him again. Take the difference and divide by the previous days weight in order to get a percentage. For example: if the chick weighs 20 grams on a given day and is weighed the next morning gains 3 grams weighing 23 grams. Divide the 3 by 20, which will total .15 or 15%.
NOTE: A 1cc syringe makes a good measuring instrument. Use jar baby food found in any food store. Two measures of Chicken Noodle Dinner may be substituted for the first two ingredients.
Make up very small quantities of this formula. Unused portions should be discarded. Drop filled syringe upside down into a cup of hot water to warm.
1) One measure Gerber or Heinz rice cereal with applesauce
2) One measure Gerber or Heinz Garden Vegetable or Spinach
3) One measure Lactated Ringers electrolyte solution
GRAM SCALE A MUST
To accurately check a chick’s weight he should be weighed using a high quality gram scale. Weigh at the same time every morning, on a empty crop. Keep accurate records of weights and observations. This data may be helpful in future studies. Growth and development can be assessed visually. If you are an inexperienced hand-feeder this can be tricky. Eventually you will be able to sense if something is just not right with a baby. Until you acquire this 'gift' it is better to purchase a good gram scale and compare your data to established weight charts. Monitoring weight gain and loss is the best way to identify a problem before it becomes visually obvious.
TUBE FEEDING
In the middle of the first week I convert from syringe feeding to tube feeding. I use small gauge latex tubing. This method, if performed properly, is most efficient and makes feeding less likely for accidental aspiration to occur. If you are more comfortable using a syringe or pipettes continue to do so—this is a personal choice. The size of the feeding implement should change as formula thickens and the chick grows. Do not overfeed, as this may result in crop overfill, regurgitation and possible aspiration, which can cause medical problems or death. Adjust feeding utensils and methods accordingly. Ideally, a separate syringe or feeding utensil should be used for each chick or for each clutch. This precaution can possibly prevent the spread of disease.
After the first critical week the baby’s crop will be able to hold enough food to sustain him for several hours. At two weeks he should be fed about four to five times a day. At Three weeks, three to four times a day. (These are approximates, amount may vary with different species.) Allowing the crop to become completely empty between feedings is recommended, but not absolutely necessary. This prevents old formula from remaining in the crop for extended periods, which could breed bacteria and fungus-based medical problems.
The End
TROUBLE-SHOOTING POOR WEIGHT GAIN
If weight gain poor, consider:
DEALING WITH CROP PROBLEMS: PART 1 ---Diagnosis & treatment.
CROP PROBLEMS, CANDIDA: PART 2--- Identification and treatment.
GUIDE TO GAVAGE FEEDING AND CROP EVACUATION---Lifesaving technique
UNDERSTANDING THE WEANING PROCESS ---What to expect and how to cope
SPLAYED LEG ---Orthopedic condition that can be corrected if identified early
KEYS TO SUCCESSFUL HAND-FEEDING---Identification, Diagnosis & Treatment
PROBIOTICS ---Probiotic therapy can help in the prevention of disease in aviary & nursery
HAND FEEDING TIPS AND HINTS---Useful Tips for hand-feeders
VINEGAR --- A natural disinfectant..
GSE ---Grapefruit Seed Extract its uses in the aviary and avian nursery
WHAT IS DE? ---Diatomaceous Earth, approved food additive, pesticide & natural wormer
THOUGHTS ON WEANING & DIET ---What foods are appropriate for weaning.
HAND-FEEDING FINCHES ---How to hand-feed tiny finches.
STAGES OF AVIAN DEVELOPMENT ---Development from hatch to weaning
Sanitation? Antiseptic? Disinfection? Sterilization? ---Understanding cleaning and disinfection products.
BACTERIA IN THE NURSERY ---Learn about good and bad bacteria & disease prevention.
THE BUSINESS OF HAND FEEDING ---Hand feeding for out. What should I charge